Monday, June 6, 2011

Your New Nail Design is Here!

It's been too long since I've updated this so here you are.
Your new nail design. This originated out of being bored of pink nails and watching The Real World re-runs.


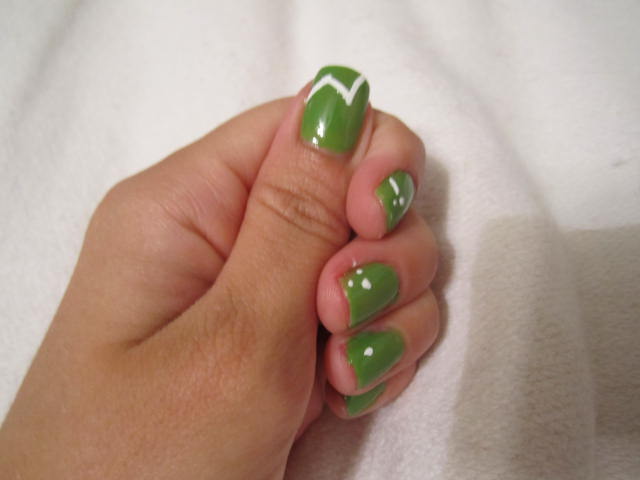
This one isn't too hard. I tried to use a brighter color in honor of the summer weather but you could do this with any base color.
Here are the steps:

  1. I always recommend using OPI Chip Skip to provide an extra layer on your nail so that the polish doesn't look rigid or broken. It dries super quick so wait time is zero. I usually apply two coats.

  2. I then apply a clear base coat. I love the Sally Hansen clear top coat. It's really nice and a great price.

  3. Then apply two coats of whatever base color you prefer, in this case I used the bright, almost neon, green you see in the photos.

  4. I then used my white Stripe Right nail polish (you can buy this at Sally's Beauty Supply pretty cheap) to make the curves. Of course, you can use any color you like. They have a multitude of colors to choose from.

  5. Apply another clear top coat with Sally Hansen (or whatever you chose)


And you're done! Enjoy.


Monday, November 22, 2010

Thanksgiving Nails!


So I was just noticing how the nail on my left thumb has always been a slightly different shape than the one on my right hand....how does that happen? No matter what I do I can't get my right thumb nail to be filed nice and perfectly square like my left thumb. Lord how it urks me!! AAHH!


But anyways - these are my Thanksgiving themed nails! I was going to do turkeys but I wanted something that I could get away with for a bit after Thanksgiving so I simplified it and made some tiny changes to previous designs I've posted on here.


I hope you enjoy the design and try it yourself!


First things first: supplies


  • OPI Chip Skip to prevent your nails from chipping

  • Sally Hensen's Clear polish

  • Sephora by OPI "In the Shadows"

  • Sephora by OPI "Caliente Coral"

  • A very fine polish brush


Steps:


  • Of course make sure you file, trim, and condition your nails before all else, but then apply the OPI Chip Skip. I use this because my nails underneath have layers that have begun to peel back. This way the polish prevents the colored polish from chipping away easier.

  • Apply two coats of the Sephora by OPI "In the Shadows" brown polish. Make sure you wait for the next step until the polish is more than 3/4 dry.


  • Take your fine polish brush (I bought a pack from Sally's Beauty Supply for $10, and dip the brush gently and not very deep into the Sephora by OPI "Caliente Coral" orange color. gently draw a line on one tip of your thumb nail. When you get a nice straight, solid line, fill in from the line to the tip of your nail. Do this to the other thumb nail as well.

  • Next, dip the brush gently into the polish again and do as many dots as you like on the thumb nails and the rest of your nails. I stuck to three in one corner on each hand.

  • As always, finish it off with a nice top coat. I used Sally Hensen's clear coat. It works VERY WELL. I must admit I was weary about hers because I prefered OPI, but my budget drove me to try this one. It's no more than $5 at Walgreens and it's well worth it.


That finishes your Thanksgiving nails! Enjoy them and please don't forget to tell people where you got the steps from!

Sincerely,
Sara, your home beauty assistant

Sunday, November 21, 2010

Worry About Pleasing Yourself....Not Others


A couple of weeks ago I bought these slippers from JCPenney - for $2!! Although they are bulky and completely outrageous and wild - I just love wearing them! Zebra stripes have been my most recent obsession....recent being the past year. Yes these are slippers but I've even worn them over my boyfriends house. No matter what people will say about my choices on what to wear - they won't matter to me because the only person I want to please is myself.


So I'd like you to remember that the only person you need to please is yourself. It gets too tiring trying to worry about everyone else. I mean your kids, family and friends ARE important, but what I'm saying is to remember that what you need is just as important as what the important people aroung you need.


And so, I will continue to wear my zebra striped slippers with pride. Plus my toes will be nice and cozy =)


Oh - and by the way - I also picked up this awesome spaghetti strap zebra striped dress from JCPenney for $4.97 ( are you getting the hint that you should really shop there between seasons??). I've had it since last year but I actually forgot about it until I was cleaning out my closet a week ago. What a gem to find! Too bad summer is gone and the harsh cold winter is settling in. But when it's spring time you can bet money that I'll be showing this baby off!

Sincerely,
Sara, your home beauty assistant

Sunday, November 7, 2010

The Halloween Stripe


The Halloween Stripe


I know it's been a while since I've updated this. It's also been a while since I've done my nails! YIKES! You caught me!! It's that time of the year though - when there's some sort of holiday party, baby shower, wedding, birthday or anniversary creeping up behind you - as well as that holiday weight.


This design started out as being a zebra stripe but it quickly turned into just black and white stripes with creepy spikes at the tips.


SO - until I can finally figure out how to correctly do zebra stripes - I will leave you with this design!


So how I did it:


I first painted my nails with a no chip clear coat followed by black (the same black I use in all my designs). Make sure you wait for it to be completely dry and smooth before going to the next step.


I then used the stripe right nail polish in white to do the stripes. You can buy this at a Sally's Beauty store. I did the stripes randomly, so there's no real order in doing them. One problem I kept running into was not making the white thick enough so you can sort of see through it.

Wednesday, October 6, 2010

Gator Nails!


What I'm listening to: "Circus" by Britney Spears

This is what I've been sporting for the Gator games this season! It's the most difficult design I've done by hand so far. You can recreate this with your own school colors.


Step 1: Always make sure you trim, file and buff your nails before you begin. I've started using an OPI "Chip Skip" coat that prevents your nails from chipping. It seems to work pretty well.
Step 2: Paint one full coat of your primary color. In my case, I used OPI's "Blue My Mind." Make sure to let it, and every other coat, fully dry!

**** TIP: Don't leave your fan on, wave your hands, or be by a draft of wind. This can cause bubbles to form in the polish.

Step 3: Get your secondary color, in my case Sephora by OPI's "Caliente Coral." You're going to paint a triangle on either the top left or top right of your nail - whichever feels more natural at the time. I did the top left of my left hand and top right of my right.

Step 4: Take the Stripe Rite polish, which I introduced in my last post, and draw a thin line dividing the two colors. You can really use any color you like, of course.
Step 5: Use a finishing coat to hold it in place and I always have a rule of allowing a full hour for it to dry. It's a GREAT excuse to watch tv or if you're brave, surf the web.


Extra Tid-bit: I used a small rectangular sponge, normally used to apply concealer, to dip into nail polish remover and remove excess polish that is definitely going to get on your fingers.

Monday, August 30, 2010

The New Kicks Plus Cute Nails to go With


I work at JCPenney and happened to find these shoes. This was the last place I expected to find them! These were only $39. They're a good fit and they don't hurt. I recommend putting regular deodorant on places where you would normally blister. I heard that trick from a co-worker and tried it - haven't had blisters since. Make sure you don't get gel or spray deodorant. I use the regular DOVE deodorant.


These were an after thought. I started off with a regular burgundy/red color. I came across a nifty invention called "Stripe Rite." It's nail polish that you can get in various colors that uses a very thin and long brush to apply the polish. It works well for stripes or any finishing touches. It makes for a much cleaner look and it's a lot less work than using a paint brush.

Friday, August 20, 2010

Gold & Black Striped Nails....got to have them - now come and get them!


The Bobcat Stripe!

I'm dedicating these nails to Buchholz High School, where I graduated in 2006 from.


I started off with using just the Sephora by OPI "Rumba Romance" gold color, then decided it looked too cheesy - and added the Sephora by OPI "What's a Tire Jack?"


Supplies:


  • Sephora by OPI "Rumba Romance" and "What's a Tire Jack?" (or gold and black equivalents)

  • A very small paint brush - particularly one you don't mind possibly destroying

  • A disposable cup

  • Nail polish remover (my favorite is Cutex)

  • A paper towel just in case and for a place to rest your brush


Here are the steps:

1. Paint all your nails the Rumba Romance color and let them dry.

2. While the polish is drying, pour a small amount of polish remover into your disposable cup so that you can set your brush in it between uses. (This is important so that the polish doesn't stick to your brush as much)

3. When the polish is dry, get your paint brush and dip it into the "What's a Tire Jack" color, making sure you have enough paint on the brush, and then go diagonally across your nail. (Don't worry about getting it on your skin because this is easily taken off)

4. Let the stripes dry.

5. Go back and put a little polish remover on the paper towel and get the rest of the paint off of your skin


I decided everytime I do something different I'll post pictures and how-to's on this blog, so keep checking for updates =)


You can also find me at : Fictionpress.com and Twitter.